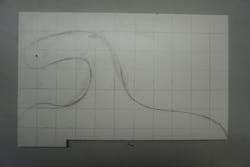
How to make routing templates for push sticks in a variety of configurations
In this Next Level carpentry video, Matt Jackson teaches how to make a push stick and makes the case for making templates rather than one-offs. If for no other reason than that it reduces the amount of sanding needed dramatically because a router does most of the work.
According to Matt, there are two kinds of push sticks: sticks and handles. A traditional stick will not only not prevent kickback, but it can actually rotate your hand into the blade during kickback, So you get broken ribs from the projectile, and you lose fingers to boot. Not a good value.
Handle-style push sticks direct your arm into your torso in the event of kickback, and they allow you to hold the workpiece, possibly stopping the blade while you turn off the saw.
Matt likes melamine-coated MDF for templates in general because it is easy to cut shape, and it doesn't dent, chip, or break easily.
Critical push-stick dimensions:
- Heel depth: 2.5 inches.
- length: 11 inches
- Heel height: 2.25 inches
- Notch the heel: 3/8 inch
- Overall height: 6 inches
- The back of the handle is about 1/4 inch in from the end and up 4 inches from the bottom
Matt uses round things in his shop to draw the arcs because it is quicker. For the back radius, he uses a can of starter fluid; for the heel, he uses Lock Ease, a socket for the back of the handle.
The handle is at about 20 degrees. This allows him to keep solid pressure on the push stick but not leave his hand diving toward the blade in the case of a mishap. The handle is about 3-1/4 inches long. Use the socket to keep the width consistent and sketch the curves. Melamine facing allows you to fair the curves together and easily erase extra marks.
Cut the bottom line up to the heel with a table saw so that the router has a perfectly straight edge to ride against.
Cut the curved lines on a bandsaw or jigsaw, leaving the line so that you can sand it with sandpaper. Matt wraps sandpaper around various sizes of PVC pipe to clean up curves (15:26- 16:20).
Trace the outline onto plywood such as Baltic Birch and cut the push sticks out with a band saw or jigsaw, again, leaving the line so you can cut down to it with a router.
Tack the template to the face of the blank. Matt uses a router table for multi-template routing.
Tip (28:46): All dryer sheets for sensitive skin wiped on your safety glasses will keep dust from sticking to the lenses for quite a while
Other push-stick configurations:
- 1/4 in thick sticks save the 3/4-inch sticks from getting cut up on skinny work.
- An extra tall heel works well with thick stock
- An extra short heel works well for thin stocl=k
- Extended nose push stick—with or without an extra handle— is good for longer stock that you want a little extra control over.
- The handle-forward version allows you to put pressure on a different part of the workpiece, which is useful on the joiner.
After easing the edges with a round-over bit on the router table, he squares up the heel notch
Cut a spacer that is the same height as the heel, for the nose to ride on.
Clamp all the blanks together, but to the fence of the tablesaw, and run them through a few times, moving the fence slightly between each cut. Drill holes in the handle using a brad-point bit and a countersink bit to clean it up.
Sand the surface with a random orbit sander and coat them with water-based varnish.
About the Author
Matt Jackson
Mat Jackson, aka, The Timber Tailor, is a master carpenter living and working in Rapid City, South Dakota. His Next Level, Carpentry YouTube channel, is well worth stalking
