Best Practices for Steep-Slope Roofing
Sweat the details or you'll drown in them
This presentation is by Doug Horgan, VP of BOWA, a Design, Build, Remodel, and Consultation company in northern Virginia.
It is part of a Best Practice series of presentations designed for site supervisors to bridge the gaps between trade contractors in order to drive down the number of callbacks and defects to zero.
Roofs offer many areas for sweating the details. Steep slope roofs behave differently from low-slope roofs. This guide is on steep slope roofs—any roof over a 4/12 pitch.
The goal of this presentation are to define the best roofing details, provide solutions to common roofing problems, give insights into which roof designs to embrace and which to avoid, and to take a look at roofing materials from a 30,000 ft. view.
"We may have spent more money on roof leaks than any other warranty item."
#WorthGettingRight
Agenda:
- Topography — framing
- Edges
- underpayment
- Sidewall
- Masonry
- Skylights
- Materials
But first, a tip:
Tip: RTFM — Read the %@#&! Manual
1 — Topography: corners, valleys, crickets, and hips (2:52)
- Keep crickets and valleys at least 6 inches away from wall corners to keep bulk water away from this vulnerable spot.It is not always easy to move a valley after the design phase, but it can be done.
- Skylights are easier to move because they often have tapered the light wells, so the bottom of the taper is not affected by movement up top.
- Chimneys are hard to move, but you can overframe one side of a roof to move a valley uphill of the chimney.
- All this is easier if you have conversations about it with roofer, framer, architect.
2 — Edges: Rakes and eaves (6:00)
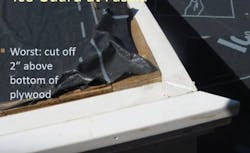
We started insisting on drip edge 15 years ago due to wood rot on fascia boards. It was added to the code in 2012.
Product notes:
- It can come in high temperature and regular. Use high temp membrane under metal roofs.
- White membranes last longer uncovered than black ones (based on conversations with engineers in the commercial side).
- BOWA generally uses Carlisle 300 HT
- Exposure time varies but is usually fewer than 60 days. Carlisle is 120 days.
Installation notes:
- Apply eaves membrane for ice damming.
- Fold membrane over the fascia about an inch, install drip edge on top of that.
- It should extend 24 inches inside the inside of the wall. This may require more than one roll width, so you can either cut a roll in half or buy 18 inch wide rolls.
- Drip edge metal should fit over the gutter. If it doesn't fit, add another strip of metal (shingle-style) to make the connection.
- Membrane on top of drip edge is permitted by most roofing manufacturers, so it is a 'second best' choice for difficult-to-sequence jobs.
3 — Underlayment: Felt and it's predecessors (8:40)
The purpose of drying in a roof is to protect the house during construction, but also as a backup layer during wind storms, and from snow and ice. Felt is the traditional choice, but synthetic underlayments have come on strong in the last five years.
Synthetic underlayments can have different permeability ratings. Some are impermeable and some are highly permeable. When does it matter? if you are building a vented roof, it does not matter whether the underlayment is permeable or not because the underside of the roof deck will be able to dry.
In an unvented roof assembly, the answer is maybe. If the membrane is impermeable, the assembly cannot dry in the upward direction up, so it must dry down. The assembly below the roof deck must permit drying if using an impermeable membrane on top of the roof deck.
Fasteners for underlayment must be compatible with the roofing type — especially for metal roofs.
Some types of roof underlayment:
- Felt: #15 and #30, permeable, inexpensive, proven or at least we know it's track record.
- Synthetic: Easier to install, wider roll, strong during construction, unproven, impermeable (usually), can be slippery. Mostly made from plastic. Titanium, Rhino, and Roof Guard are three examples.
Installation tips:
- Run underlayment 6-8 in. up the sidewalls behind step flashing. TIP: If it runs higher than the step flashing, it is easier to QC.
- Run underlayment over edge at rakes and eaves. This way, even if rain gets under the drip edge, it will not get past the membrane to damage structural components.
- Ice guard should be installed in valleys. Its self-sealing properties make it a good choice.
- With some types of roofing (shakes, slate, tile), hips can be vulnerable, too because they catch a lot of wind, so it may be worth adding a strip of roofing membrane up the ridges.
- Steep to low slope transitions need membrane that runs 12-14 inches up the steep roof. Or run the EPDM membrane up the roof and keep shingles off the bottom portion.
Bankruptcy Alert:
Black membrane can stick like crazy to asphalt shingles. Can be extremely difficult to remove the shingles for reroof or repair. Think about it in your tear-off estimates.
4 — Sidewall connections (24:50)
This tip just in from the 'We-Hope-This-is-Obvious' desk: overlap house wrap over step flashing.
Water can blow through step flashing, so correct overlap matters. Sometimes the people doing the step flashing are new to the business, and you may need to explain the above tip to them. If step flashing is installed over house wrap, cut the house wrap and slip a flap in to make the transition.
Correct overlapping. Roofers often put stuff in front of the house wrap. This is probably the number 1 error on roofs at BOWA.
Key points for Roof/Wall connections:
- Roofs get replaced, so make it easy to replace them. Counter flashing makes it easy to replace step flashing and roofing. A two-inch gap between the siding and the roof surface prevents siding from wicking water and rotting.
- Kickout flashing is relatively new. Very important on stucco because water that gets in has nowhere to go but trouble.
- Step flashing size: 4x4 is specified in the code; best practice sizing: length = shingle exposure + 2 inches. Many lumberyards do not have this in stock, but others (Home Depot) do.
- For windows that are close to roof plane, run the peel and stick up from the roof over the sill.
Chimneys, sidewalls and other situations. Masonry will absorb water. so that needs to be planned for. The tricky part is that this involves two subs, so the superintendent must play a key role.
- For cladding, there is usually some sort of gap and drainage plane. Weep holes at the bottom of walls allow the water to drain out.
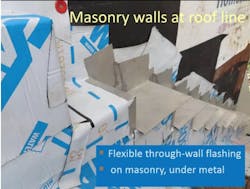
- For chimneys, a through-wall flashing is required.
- We now wrap the metal with peel and stick membrane mainly because the mason's have it on site and can wrap it right now making the connection water tight during construction. It is also a great backup layer for pinhole leaks in the metal.
Installation tips:
- Getting the step flashing in the right place: Hand the mason a 2x4 tell him to lay it along the rake and make sure the corners are even with the top of the 2x4
- Step size: For brick, use two bricks (~5-1/2 in); for block, use the block (~4-6 in)
- The same holds for chimneys, but you must choose how far in to go with the flashing.
- If you waterproof the block, then the flashing should go through the veneer to the waterproofing layer.
- Otherwise, go all the way through the chimney to the liner.
- Add metal tabs to hold the masonry from sliding back down the roof.
- Weep holes go above the through-flashings. Weep holes let water out, but calcium stays behind. This is a serious aesthetic issue and the best way to stop it is to stop water from going through the masonry:
- Water resisting sealant (xylene) on the masonry
- Choose s masonry style that allows you to tool the joints (not dry stack)
- The cap plays an important role, they do not keep water out if they are cracked. Metal cap costs the same as rebuilding the mortar cap., so it is worth just doing the first time.
6 — Skylights (43:15)
The easiest way to avoid skylight troubles is to buy Velux units. They are super reliable.
- Perfect flashing kits — factory built head and bottom flashing that cannot be duplicated in the field without solder.
- Step flashing
- Velux features glass, which works better than acrylic
- They also have a condensation management gutter.
- Good down to 3/12 roofs.
- Secret advice: follow the directions.
7 — Materials (46:40)
Asphalt:
Everything in this video/article page applies to asphalt shingles. They are reliable, simple, effective.
- Cost: $200 — $750:sq. ft.
Cedar shakes and shingles
- Last 15-20 years
- $850 — $1200 sq ft
- Require air below for circulation — skip sheathing or cedar breather.
- Shakes get felt between rows, shingles do not.
Slate
- Last for 75 -150 years
- $1300 — $2400 sq
- VT and VA skate are good
- Spanish (verified) slate is good
- Canadian is good
- If the roof lasts 100 years, make sure the vent cap, nails, flashings, and other parts last that long too.
Plastic slate
- $700 — $1600
- We have had good luck with eco star
- 50 year warrantee, never had an issue,
- It is critical the blend the batches, because the color uniformity is, well, non uniform.
- Wary of this category because there have been
Fiber cement shingles
Avoid. Many companies have gone out of business, lawsuits, fuggedaboutit.
Standing seam metal roof
- Painted and galvanized
- Can last 100 years if you paint it every 20 years.
- $750 — $1500/sq
- Copper is much more expensive. 1300-2500/sq. Another funny thing about copper: it leaves green deposits as water runs off it. This may affect the deck or patio below.
- Joe Lstiburek says that all metal roofs leak a little, so underlayment matters a lot.
—Doug Horgan is a Vice President of BOWA, a Design, Build, Remodel, and Consultation company with offices in McLean and Middleburg, Virginia. Doug is also one of ProTradeCraft's technical advisors.

