Will It ROT? New Tool Helps Predict Effects of Exterior Continuous Insulation
Building Science Advisor is an online tool from Oak Ridge National Laboratory that makes high-performance walls less risky.
At the 2025 International Builders' Show in the ProTradeCraft Construction Training Zone, we demonstrated how to add a layer of continuous exterior insulation to a wall with window and door openings. Later, a representative from the Oak Ridge National Lab gave a presentation on the Building Science Advisor tool, which can help remodelers assess the risk of wall assembly for moisture, mold, and heat leakage.
You can add, subtract, and change layers in a wall assembly to compare performance and risk. Building Science Advisor could help siding contractors, remodeling contractors, and design-build companies determine how much insulation is needed and where.
Select your climate zone either with the Zip Code or by specifying it from a dropdown menu.
Step 1: Choose your climate zone or Zip Code
Select your climate zone either by clicking on the map or entering your zip code (image above). Next, select what you want to assess: new construction or retrofit. After selecting retrofit, there are three options: gut rehab, a rehab from the inside, or a rehab from the outside. Based on that selection, the tool provides suggestions for your rehab method.
Before and After: Specify the existing and upgraded wall assemblies
Step 2: Select cladding and exterior insulation options
Dropdown menus allow you to define the existing wall and retrofit walls, including wall cladding, WRB/building paper, rainscreen options, wall construction, cavity insulation, and interior finishes.
For example, let's assume we want to add continuous exterior insulation while re-siding a house in climate zone 5A, perhaps somewhere in Pennsylvania or Ohio. The house has standard 2x4 walls, 16 inches on center, with fiberglass batts in the cavities, drywall and latex paint inside, wood sheathing, building paper, and vinyl siding outside (image above).
Step 3: Adjust as needed to stay in the safe zone
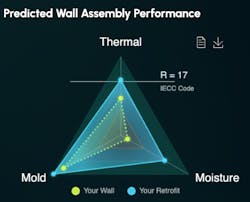
To the right of all the dropdowns is a triangle graphic with moisture, mold, and thermal representing the triangles. The bigger the triangle, the better or less risk associated with the points. In the center of the triangle is a smaller red triangle: the danger zone.
In the example, which is for a house in climate zone 5A (cold and humid), the existing wall is represented by a yellow triangle with three points outside the red zone. Moisture and thermal are in the risky zone; mold is within the safe zone.
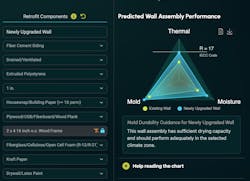
The retrofit wall (image below) is represented by a teal triangle (at least, I assume it is teal, as I am color-blind). The results show that adding one inch of insulation improves thermal performance significantly and keeps mold risk thoroughly in the safe zone. It also decreases moisture risk, but not enough to move it out of the risky area.
Good, but not great. Adding one inch of exterior continuous insulation lowers the risk of moisture damage and mold growth while barely meeting the energy code.
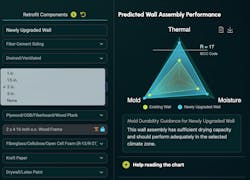
The easy solution is to bump the exterior continuous insulation from one inch to two inches (image below), which pushes thermal performance well above IECC requirements and places moisture risk squarely in the safe zone.
A highly performing wall. With two inches of insulation outside the wall sheathing, mold and moisture risk are practically eliminated, and thermal comfort is dramatically improved.
Limitations of the Building Science Advisor tool
While this tool is a handy desktop gut check, it cannot replace a hydrothermal analysis, such as WUFI analysis, which many architects and engineers use. WUFI is a tool that the Fraunhofer Institute for Building Physics first developed, and the acronym stands for Wärme und Feuchte Instationär, which obviously is German and translates to Heat and Moisture Intransient.
Instead, the Building Science Advisor is more of a back-of-the-envelope tool that helps reduce risk in general.


