Stair Trim-Out (4)—Wrapping a Tall Post in Place
This is part of a long series of articles on stair trim-out. In a previous article, I built box newels to attach to the staircase. In this article, I'll to wrap an existing post in place.
When I first looked at this staircase I noticed that the two starting newels were not located symmetrically on the first tread. The right one was correct, but the left one was about an inch too far to the left.
The reason for this was that the carpenter who framed and set up the staircase had centered the lower left newel on the 4x4 that ran from the floor up through the winders and acted as the center of the lower newel on the upper flight.
Adjusting for incorrect framing
Since the central post was going to be wrapped with 1x boards (to make it look like a 6" square newel), I could push that wrapping to the right as far as it would go to make the lower newels symmetrical to the stairs.
This adjustment changed the alignment of newels upstairs, but it was a very short run in a private area with nothing else to compare against, so very few would notice the difference.
The symmetry of the starting newels was more visible and important.
Wrapping the post, one piece at a time
To wrap the center post, I needed 5 pieces of 6" wide fir of different lengths. I planed, ripped, and jointed them all to the proper thickness and width and grooved them for biscuits.
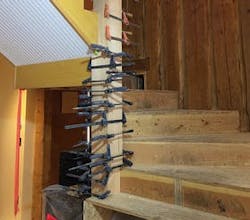
Each piece was scribed to fit in its designated place, and then they were all glued together and clamped in place. I started at the bottom with the piece that tucked under the landing and worked counter-clockwise.
Next was the only full-length piece that ran from the floor to the top of the 4x4 post, beside and above the lower flight of steps. And then, the three pieces that sat on treads that formed the winder. I dry-fit everything together and checked the post for plumb in both directions, making sure nothing was too distorted or bent. Once it all looked good, I disassembled, glued, re-assembled, and clamped.
Glue-up with a plan and a purpose
I started at the bottom, making sure the miter joints were tight and aligned. I worked my way up and around the post to the top. I left the assembly clamped overnight. The next day. I removed the clamps, scraped off the excess glue, sanded all of the surfaces, and routed the corners with a 1/8-inch roundover bit.
The next step is to stain and seal the post and then install the box newels. After that, I'll tackle the treads and risers.
Other articles in this series:
About the Author
Christian Whalen
Chris Whalen is the owner of Black Mountain Company, a renovation, building, and woodworking company in Missoula, Montana. He is also a member of ProTradeCraft's technical advisory team.
