FIELD TRIP: A Peel-Away Peek at High Performance Walls
Modesty is overrated
I was scouting a job site of David Joyce, when he told me of an unfortunate event at a house he had built 5 years prior. I was familiar with the house because I had shot video during construction and photographed it after completion.
This house was designed by Betsy Pettit and Building Science Corporation; at the time, I was interested in its superinsulation techniques and the airtight construction methods. That's what we covered five years ago, and I was delighted to have the opportunity to look inside the walls to see how they're holding up.
The reason I was able to peek inside the walls is unfortunate, though.
So a cable guy walks up to a house with a drill ... what do you think happens next?Yup. He drills into the side of the house, hits the service cable—the big, fat, gray one feeding the main panel—with his drill bit.
#TrueStory
Fortunately, he was not killed. Unfortunately, it caused a fire hot enough to melt the aluminum wire (aluminum melts at 1200F). Even though the fire lasted only seven minutes, it caused a lot of damage — though not as much as the firemen caused.
I thought you'd like to see what it looks like inside the walls of a Building Science Corporation house:
Close-up details
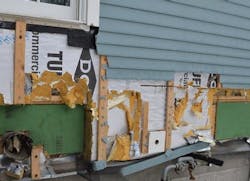
At the top of this article is a wide shot of the exterior peeled back to the framing; this is a closer look at the bottom of that wall.
The construction is 2x6 framing, 24 inches o.c. Four inches of foam sheathing was glued directly to the studs—except where sheer panels were necessary, in which case 3 1/2 inches of foam sheathing was installed over the 1/2-inch shear panel. Fortunately, none of the shear panels were damaged in the fire or firefight.
Outside the foam sheathing is wood strapping and fiber cement siding. Metal flashing and insect screen keep bugs out of the foam and vent channels.
Design sidebar: The homeowner wanted the siding exposure to graduate up the wall: close together at the bottom, regularly spaced after about two feet. This is a traditional New England detail that helped houses on the Cape resist splashback water at the bottoms of walls.
Attaboy sidebar: Take a look at what a nice job was done with the siding: it aligns with both the top and bottom of the receptacle block on the right in the photo.
Here's another photo that illustrates a lot of good details:
- The bead of adhesive along the bottom plate (above the Zip panel).
- The bottom window flange is untaped so that water can drain out if it gets in, while the side flanges are taped to prevent water from entering in the first place.
- The second layer of foam board has taped seams. Dave doesn't tape the first layer because when the strapping is installed, the foam compresses, which pulls the seams away from the tape. Taping the first layer of foam, in Dave's opinion, is a complete waste of time. Stagger the seams, tape the second layer is his advice.
→ FYI, you can also see the finished look of the graduated siding on the undamaged wall on the left.
Moving down into the basement five years later, we can see if what Dr. Joe talked about was actually executed in the field.
Looks like Synergy's carpentry skills were up to the task of traditional window trim-out, and their air-sealing skills were up to the task as well. Two windows from the basement show the finished and "peel-away" versions of a best-practice window installation.
Sealant, caulk, canned foam, and peel-and-stick membranes working together to accomplish a goal. Why can't Congress be more like this window?
Backing out a little gives us a view of the interior basement wall construction from concrete wall to painted drywall:
Beginning at the top and moving down, here are the high-performance details:► The rim joist above is sealed with spray foam. Rim joists are the source of one of the biggest air leaks in a house
► Two inches of XPS foam covers the concrete wall. This keeps the interior warm and dry.
► A 2x4 stud wall, 24 in. o.c. sits on top of a capillary break (sill gasket). This is to stop wicking, even though there will be no moisture sneaking into this slab. BSC also uses metal studs in basements.
► Fiberglass batts with kraft facing fill the stud cavities, then drywall, then paint.
► The slab floor sits on top of a layer of XPS that turns up the wall at the perimeter, so the slab is "floating" in foam.
► Under the slab is a bed of gravel; perimeter drains lead to a sump pump in the corner.
All in all, there are a lot of Atta-Boys to go around on this job. Please let this story be a lesson: Do not blind-drill into building assemblies. Look before you [bleep].
About the Author
Dan Morrison
Dan Morrison is a founding editor of ProTradeCraft.com, where he is also the editor-in-chief. Fun fact: Dan is also a founding editor of Green Building Advisor and executive editor of Fine Homebuilding.

