Through years of experience in the warranty and handyman repairs division of BOWA, I have gotten to know several things that I know do not work. My job now is to visit in-progress jobs and help subcontractors, project managers, and designers skip these spots that I know will fail down the road.
Any roof with a slope under 4/12 is considered low slope. Most roofing materials (asphalt shingles, typical skylights, etc.) are designed to work on a 4/12 roof or greater. Standing seam metal roofs can go down to 3/12, but anything below that means that means using some type of membrane, a soldered connection, or something that is 100 percent waterproof.
When it comes to low slope roof systems, there are four main areas to consider:
- Low slope roofing materials
- Common problems
- Designs: better and worse
- Best details
Before considering these points, begin with the manual. You can almost always find the detail you need in these manuals.
- Copper Development Association (free)
- Sheet Metal and Air Conditioning Contractor's National Association (SMACNA) ($116)
- Firestone roofing details
- Johns Manville Roofing Guides
- Petersen metal roof details
Section 1:Roofing Materials
Materials have limitations and it is important to know what they are when specifying. It's also good to know when talking to clients who want to change materials. You need to know what will work and what will not to help them make choices. we're talking about three systems:
- Metal
- Single Ply membranes
- Torch down/Built-up
Metal: Copper, stainless, aluminum, and steel.
Copper and stainless steel can be soldered, aluminum and steel cannot.
The key point about a metal roof is that if they are not soldered, they will leak.
"If a metal roof is not soldered, it will leak."
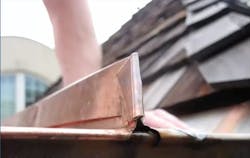
I was on this expensive copper roof for one reason—because it was leaking.
It was leaking because the end of the standing seam was not soldered.
Steep roofs can tolerate less stringent detailing, but with wind driven rain and a low slope, then water will start working its way through the joints.
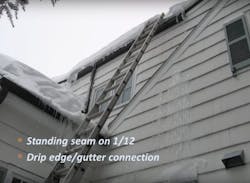
Here's a roof that I did with a very low slope and a standing seam roof. It did not leak until the gutters were full of ice and the water and ice worked its way up to—and ultimately covered—the unsoldered standing seams. Because we did not have a good enough backup layer, the roof leaked.
This picture also illustrates why leaky roofs are so bad: because you (I) have to climb up on a ladder in the middle of winter, or during a rainstorm to figure out why it is leaking.
We fixed this roof by removing and replacing the bottom six feet of roof—fully soldered with Ice and Water shield under.
Copper moves a lot
On a 30 foot long roof that we did, the shrinkage actually tore the copper. In the DC area, when the sun shines on a metal roof, it can heat up to 175 degrees F. At night, black sky actually pulls heat from surfaces—a dark surface will get much colder than the ambient air around it.
In DC, there can be a 180 degree difference between a hot day in summer and a cold night in winter.
This differential can cause 3/8 inch of movement in 10 feet of roof. That 30 foot roof had an inch less copper installed than what it stretched to.
Movement joints are the new construction solution, but it can be tricky on a remodel. The drawing shows a movement joint from the Copper Development Association
The other important thing to keep in mind is that the pans should be small. Large pans soldered together will break the solder joints when they expand and contract.
Length of the metal has implications with edge metal and other flashings, too. Soldered seams between two long pieces of edge metal can crack.
The sheet metal book says that joints in flashings "require maintenance." This means that the joints are going to fail, so it is important to have a good backup layer.
The bottom line for copper: Plan it for movement, make sure you have a good backup.
Stainless steel is not as common as copper, is harder to solder, and needs to be fully soldered, like copper. And its more expensive than copper. In my opinion, there is no reason to use it.
Steel and aluminum should not be used for low slope applications because it cannot be soldered.
BUT
Petersen says you can use their product on a 1/12 roof, which we tried. There are four steps:
- Cover the roof with Ice and Water shield
- Install Valley Metal
- Ice and Water shield over the top of the valley
- Install a hook cleat for standing seams to fasten to.
The theory seems logical for new construction—again—but it gets very tricky on a remodel. The system seems good, but it relies on field-applied caulk, which will move with expansion and contraction, and the whole thing is very labor intensive.
At the end of the day, I just do not think metal is a good choice for low slope roofs. There is too much movement, the joints fail, and it turns out to not be as durable as it seemed.
We use single-ply membranes a lot
They are the least expensive, and they work really well. They are flexible and tough. The only weak spot is the seams and penetrations.
EPDM is very strong and durable
The main tip with an EPDM roof is always to use the seam tape and cap seal the seams. The seams do require maintenance, so plan for it. One other issue is that EPDM is not compatible with asphalt.
And a lot of roofers have a lot of asphalt products in their trucks.
TPO comes in colors that our clients prefer
Grey, beige, and white plastic membranes are also better at reflecting heat and lowering the cooling load on an AC unit. The seams are bonded with a heat gun; it becomes an extremely durable joint that cannot be 'freeze-thawed' apart. It can be bonded to metal, but this requires a special paint that it can heat bond to. If you do not use the special paint, the bond is less awesome.
It is nearly compatible with asphalt in that it can touch without degradation, but it should not have peel and stick membrane stuck to it.
PVC
Polyvinyl chloride is a white plastic sheet that is bonded with heat gun. PVC is not UV resistant, so it requires extra chemicals in an already chemical stew, which amount to a lot of really bad chemicals. PVC is also incompatible with asphalt, so I avoid specifying it.
We have not had any issues with the one or two roofs we have used it on.
Torch down roofing is sheets of asphalt melted together
Torch down got a bad rap in the 90s because of some buildings that burned down during roof installation. With some good torch technique protocol, torch down is back on the market. It is an excellent c. A double layer of modified bitumen roofing is very durable and reliable. It is fully compatible with asphalt because it is asphalt.
Section 2: Key Roofing Details (20:10)
- Slope
- Drains vs. scuppers vs. edges
- Roof/wall connections
- Curbs, parapets, edge metal
- Penetrations
- Transitions to other Roofing
Slope: There is no such thing as a flat roof.
1/4 inch per foot is what most people say, and it is also the code.
The Math:
- <1/4"/ft slope = Puddles
- Puddles = Leaks
- Leaks = Me climbing a ladder in a rainstorm at night = BAD
We use tapered foam to add slope to a flat roof frame.
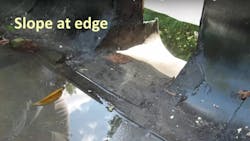
Slope is key at the scupper and roof edges. Edges and scuppers get built up with layers, and the layers can build up higher than the slope. If you can taper the framing (cut the end of the rafters 3/8 in to nothing over 8 inches), it will help to make up for the extra layers.
It is best to frame scuppers below the roof level to speed the discharge process.
Speaking of the discharge process—
Drains vs. scuppers vs. open edges
Drains and scuppers can get clogged. If they do, water can accumulate as high as the parapet walls will let it. A foot or more of water could collapse an old roof. Another problem could be 150 feet away where a landscaper crushed the drain line causing the system to back up and the roof to leak.
The best way to install a roof drain is with a compression ring
The way to do a drain properly is to use a clamp ring assembly and then seal the roof to the top of the drain body. Then clamp it with a clamp ring. If the pipe backs up, water cannot go into the house, it stays on the roof.
These can also be retrofit. A Pipe slides into the existing drain pipe and has a neoprene ring that seals between them. I am not a huge fan of drains, because there is a lot that can go wrong. I am even less a fan of built-in gutters. Built-in gutters are a worse version of a drain. They are better at collecting leaves than they are at discharging water.
Because copper moves and solder cracks, these built-in gutters leak. Because the gutters are built-in, they leak water into the house. That is the opposite of what they are supposed to do.
I just think they are a terrible idea.
Scuppers should be below the roof level
Scuppers get clogged too, so they need to be made large enough to work. At least 8 inches tall and at least 12 inches wide are my guidelines based on what I've seen work and not work. I saw one that was four feet wide, but only four inches tall that clogged, so it is not about area as much as it is about minimum dimensions.
Firestone has great details for scuppers, too. But here's the rub: even the easy details are complicated and I do not always see roofers do all the steps in the easy drawings. I feel like scuppers should be avoided too, unless you have a really good roofer.
Open edge drains freely
The best way to drain a roof is to get rid of the walls keeping the roof from draining. If you really need a parapet wall for wind resistance, try building a false parapet using posts for structure and holding the wall claddings above the roof surface.
If you do not need a parapet wall, let water drain over the open edge of the roof into a gutter—an exterior gutter.
Roof/wall connections
All the books say that connections to walls from the roof surface should be 8 inches tall. The roofing membrane should extend up the wall 8 inches. That's a pretty high curb for a door.
I think six inches is plenty for residential in the DC area. Do not tell anyone, but I think a 4 inches curb under a door leading onto the roof with slope on the roof is plenty. Plenty for a house in the DC area, not Valdez, AK.
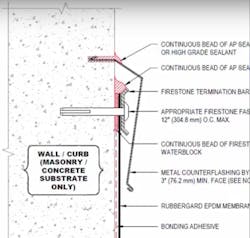
Termination bars are used for masonry wall connections, with a regletted flashing above. As long as not too much water soaks into the masonry, this works. The kerf should be 3/4 inch deep, which should stop most absorbed water from getting behind.
The siding doesn't have to be 8 inches above the roof, but it should not be tight to it, either. Leave 2 inches clearance below the bottom of siding for retrofit roofing work space. You can cover the 2 inch gap with bent metal counter flashing.
Another key consideration for doorways or low windows above an EPDM roof: It is best to run the EPDM up and over the opening to make a pan. This is great, but it means that you cannot use asphalt-based tapes to flash the door, you need butyl.
Penetrations
- For vent stacks, use factory boots. That is what it says in the book, do it. Do not try to make one.
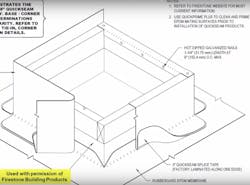
- Flash rectangular shape penetrations like you would flash a skylight curb.
- If you do not know what a Pitch Pocket is, do not bother learning. If you do know, do not bother using one.
Curbs, parapets, edge metal
Particularly on membrane roofs, metal flashings will cover the perimeter. Because joints move and can open, it is best to run membrane under the metal.
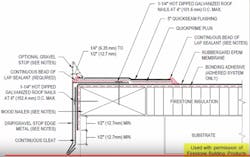
Like metal drip edge flashings, metal wall caps on parapet walls also move and are difficult to seal. The best way to do it is to run the membrane up the parapet, over the top and down the front for a couple of inches, then cover with parapet metal, as illustrated in the skylight drawing below.
Sloping the top of the wall toward the outside is another way to combat leaky metal.
Skylights can leak inside and outside.
Skylight curbs on low slope roofs are like mini parapet walls. Curbs are often capped with metal, which can leak, so if the curb is not waterproof (is it ever?) then the skylight can will leak.
Skylight summary: (49:19)
- Wrap up and over
- Condensation will drip inside, plan for it
- Aluminum joints will leak, plan for it.
- Slope skylights to reduce debris on glass
Transitions to other roofing
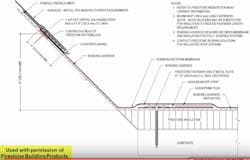
This detail is from Firestone, it shows a strip of metal between the shingles and the EPDM, so they aren't actually touching. This is a great detail.
They also show a minimum of 8 inch rise on the EPDM; I do not think that is enough. I say that because I have climbed up on, and taken pictures of, roofs that leak due to leaf buildup, snow buildup, or ice dams.
I prefer to run the roofing membrane way up the roof—16 inches - 24 inches—so that the membrane is the actual ice dam protection (rather than peel and stick), and hold the shingles higher off the transition.
Unless it is visible.
Bottom Line Recommendations for Low Slope Roofs:
- Use membrane roofs for under 3/12 slope.
- Send water to an open edge, with a conventional metal gutter.
- Slope everything at least 1/4 inch per foot.
- Allow a 6 to 8-inch step at walls
- RTFM—it has all the best details
